Quantcast
Channel: DevExpress Support Center (Examples)
Viewing all 7205 articles
Browse latest View live

WinForms SpreadsheetControl API - Part 3

$
0
0

This example is the third part of the SpreadsheetControl API set of examples that demonstrates how to use the SpreadsheetControl API to programmatically manage spreadsheet documents, without the need for Microsoft Excel to be installed.

This sample introduces API properties and methods used to perform the following operations:

- Apply data validation to control the type of data or the values that users enter into a cell

Starting from v2016 vol.2:
- Remove rows and columns that meet the specified condition
- Custom XML Parts examples

See also:
WinForms SpreadsheetControl API
WinForms SpreadsheetControl API - Part 2

Files to look at:

CustomXmlPartActions.cs (VB: CustomXmlPartActions.vb)
DataValidationActions.cs (VB: DataValidationActions.vb)
RowAndColumnActions.cs (VB: RowAndColumnActions.vb)

WinForms SpreadsheetControl API - Part 2

$
0
0

This example is the second part of the SpreadsheetControl API set of examples that demonstrates how to use the SpreadsheetControl API to programmatically manage spreadsheet documents, without the need for Microsoft Excel to be installed.

This sample introduces API properties and methods used to perform the following operations:

- Insert, delete and modify pictures
- Add a hyperlink to a picture
- Add custom functions to the spreadsheet

Starting from v2013 vol.2:
- Create a table
- Apply a custom style to the table

Starting from v2014 vol.1:
- Protect a workbook
- Protect a worksheet
- Apply user-specific permissions to a range in a protected worksheet
- Sort a range in descending and ascending orders
- Sort using a custom comparer
- Sort by multiple columns
- Simple search
- Search with options
- Export to HTML

Starting from v2014 vol.2:
- Group and outline data
- Insert subtotals
- Filter the data by a list of values
- Apply a number filter
- Apply a text filter
- Apply a dynamic filter
- Sort the filtered data
- Specify the built-in document properties
- Specify the custom document properties

See also:
WinForms SpreadsheetControl API
WinForms SpreadsheetControl API - Part 3

Files to look at:

AutoFilterActions.cs (VB: AutoFilterActions.vb)
CustomFunctionActions.cs (VB: CustomFunctionActions.vb)
DocumentPropertiesActions.cs (VB: DocumentPropertiesActions.vb)
ExportActions.cs (VB: ExportActions.vb)
GroupAndOutlineActions.cs (VB: GroupAndOutlineActions.vb)
PictureActions.cs (VB: PictureActions.vb)
ProtectionActions.cs (VB: ProtectionActions.vb)
SearchActions.cs (VB: SearchActions.vb)
SortActions.cs (VB: SortActions.vb)
TableActions.cs (VB: TableActions.vb)

Spreadsheet Document API - Part 2

$
0
0

This example demonstrates how to use the Spreadsheet Document API to programmatically manage spreadsheet documents, without the need for Microsoft Excel to be installed.
The application includes the RichEditControl  used to display and edit the code. The code modifies the spreadsheet document loaded in the Workbook instance. To see the results, open the document in Microsoft Excel by clicking the button.
You can modify the code and watch the result. If an error occurs during compilation or execution, the backcolor of the code window changes.

This sample introduces API properties and methods used to perform the following operations:

- Insert, delete and modify pictures
- Add a hyperlink to a picture
- Create a table
- Apply a custom style to the table
- Protect a workbook
- Protect a worksheet
- Apply user-specific permissions to a range in a protected worksheet
- Sort a range in descending and ascending orders
- Sort by multiple columns
- Simple search
- Search with options
- Export to HTML
- Group and outline data
- Insert subtotals
- Filter data by a list of values
- Apply a number filter
- Apply a text filter
- Apply a dynamic filter
- Sort the filtered data

For more information, review the Examples section in the documentation.

The Universal Subscription or an additional Office File API Subscription is required to use this example in production code. Please refer to the DevExpress Subscription page for pricing information.

See also:

Spreadsheet Document API - Part 1

Spreadsheet Document API - Part 3

Files to look at:

AutoFilterActions.cs (VB: AutoFilterActions.vb)
ExportActions.cs (VB: ExportActions.vb)
GroupAndOutlineActions.cs (VB: GroupAndOutlineActions.vb)
PictureActions.cs (VB: PictureActions.vb)
ProtectionActions.cs (VB: ProtectionActions.vb)
SearchActions.cs (VB: SearchActions.vb)
SortActions.cs (VB: SortActions.vb)
TableActions.cs (VB: TableActions.vb)

Spreadsheet Document API - Charts

$
0
0

This example demonstrates how to use the Spreadsheet Document API to programmatically manage charts in worksheets.
The application includes the RichEditControl used to display and edit the code. The code modifies the spreadsheet document loaded into the Workbook instance. To see the results, open the document in Microsoft Excel by clicking the button.
You can modify the code and watch the result. If an error occurs during compilation or execution, the backcolor of the code window changes.

Starting from v2015 vol.1:
- Insert and modify sparklines

The Universal Subscription or an additional Office File API Subscription is required to use this example in production code. Please refer to the DevExpress Subscription page for pricing information.

Files to look at:

AxesActions.cs (VB: AxesActions1.vb)
AxesActions1.cs (VB: AxesActions1.vb)
Charts.cs (VB: Charts1.vb)
Charts1.cs (VB: Charts1.vb)
CreationAndDataActions.cs (VB: CreationAndDataActions.vb)
DataLabelsActions.cs (VB: DataLabelsActions.vb)
LegendActions.cs (VB: LegendActions.vb)
Protection.cs (VB: Protection.vb)
SeriesActions.cs (VB: SeriesActions.vb)
SparklineActions.cs (VB: SparklineActions.vb)
StyleActions.cs (VB: StyleActions.vb)
TitlesActions.cs (VB: TitlesActions.vb)
TrendlineActions.cs (VB: TrendlineActions.vb)
ViewOptionsActions.cs (VB: ViewOptionsActions1.vb)
ViewOptionsActions1.cs (VB: ViewOptionsActions1.vb)

How to turn off word wrapping in the Simple view and use the horizontal scroll bar to scroll a long text

$
0
0

This example is obsolete. Starting with version 16.2.12, our RichEditControl supports horizontal auto-scrolling in disabled word wrap mode out of the box. Please refer to the The horizontal scrollbar incorrectly operates in SimpleView when the SimpleView.WordWrap property is disabled thread for more information.

At present, the Simple view does not support auto-scrolling. As a workaround, switch RichEditControl to the Draft view and specify a large width for it via the SectionPage.Width Property. To emulate the Simple view, hide the ruler and scrollbar by setting the RichEditControl.Options.HorizontalRuler.Visibility and RichEditControl.Options.VerticalScrollbar.Visibility properties to the Hidden value. In addition, you can adjust document content padding in the manner illustrated in the How to adjust left padding of a document in RichEditControl example.

Files to look at:

Form1.cs (VB: Form1.vb)

How to implement OData4 service with XPO (.NET Core)

$
0
0

This example describes how to implement an OData4 service with XPO. This example is an ASP.NET Core 2.2 MVC Web API project and provides simple REST API for data access.

Steps to implement:

1. Create a new ASP.NET Core Web Application project and select the API project template.
2. Install the following nuget packages: • DevExpress.Xpo
• Microsoft.AspNetCore.OData

3. Define your data model - implement persistent classes and initialize the data layer. If you are new to XPO, refer to the following articles to learn how to do this: Create Persistent Class, Map to Existing Tables.
4. Add files from the CS\OdataService\Helpers folder in this example to your project (Quick Tip: Add files to Visual Studio projects the easy way).
5. Add Connection String for your database to CS\OdataService\appsettings.json file (in this example, used MS SQL LocalDB database):
"ConnectionStrings": {"MSSqlServer": "XpoProvider=MSSqlServer;data source=(LocalDB)\\MSSQLLocalDB;Integrated Security=true;MultipleActiveResultSets=true;initial catalog=ODataTest"
  }
6. Modify the ConfigureServices() method declared in the Startup.cs file: register XPO UnitOfWork and OData services in Dependency Injection:
[C#]
publicvoidConfigureServices(IServiceCollectionservices){services.AddOData();services.AddODataQueryFilter();services.AddMvc(options=>{options.EnableEndpointRouting=false;}).SetCompatibilityVersion(CompatibilityVersion.Version_2_2);services.AddXpoDefaultUnitOfWork(true,(DataLayerOptionsBuilderoptions)=>options.UseConnectionString(Configuration.GetConnectionString("MSSqlServer")).UseAutoCreationOption(AutoCreateOption.DatabaseAndSchema)// debug only.UseEntityTypes(ConnectionHelper.GetPersistentTypes()));}
7. Modify the Configure() method declared in the Startup.cs file: add middleware for OData Services and add mapping for OData Service route:
[C#]
publicvoidConfigure(IApplicationBuilderapp,IHostingEnvironmentenv){if(env.IsDevelopment()){app.UseDeveloperExceptionPage();}else{// The default HSTS value is 30 days. You may want to change this for production scenarios, see https://aka.ms/aspnetcore-hsts.app.UseHsts();}//app.UseHttpsRedirection();app.UseODataBatching();app.UseMvc(b=>{b.Count().Filter().OrderBy().Expand().Select().MaxTop(null);b.MapODataServiceRoute("odata","odata",SingletonEdmModel.GetEdmModel(),newDefaultODataBatchHandler());});}
8. Add OData controllers to the Controllers folder. An OData controller is a class inherited from the Microsoft.AspNet.OData.ODataController class. Each controller represents a separate data model class created on the third step.
9. Implement the required methods in controllers (e.g., Get, Post, Put, Path, Delete, etc.). For reference, use existing controllers in this example. For example: CS\ODataService\Controllers\CustomersController.cs.

Web Dashboard - How to store JSON connections in a database

$
0
0

This example demonstrates how to create new JSON connections in Web Dashboard's Data Source wizard and store them in a database.

Set the ASPxDashboard.CanCreateNewJsonDataSource property to True to allow creating new JSON connections. Implement the IDataSourceWizardConnectionStringsStorage interface to create custom connection string storage, and use the ASPxDashboard or DashboardConfigurator's SetConnectionStringsProvider method to assign it to the Web Dashboard.

In this example, connections are stored in a database using Entity Framework. To run the example, modify the "ConnectionStorage" connection string in Web.config.

Files to look at:

ConnectionStringsStorage.cs (VB: ConnectionStringsStorage.vb)
MyJsonConnection.cs (VB: MyJsonConnection.vb)
Global.asax.cs (VB: Global.asax.vb)

Expression Editor - How to implement a custom New Line and Format functions

$
0
0

This example demonstrates how to implement custom functions for the Expression Editor available in the WinForms End-User Report Designer. In this example, we implement two custom functions.

1. The new line function allows you to insert a new line at the required place in a string. This function uses the Environment.NewLineconstant, which returns a new line string defined for the current environment. Note that to make the label recognize this string as a line break, the XRLabel.Multiline option must be enabled.

2. The CustomFormatFunc(string format, object arg0) accepts a format string and a value that should be formatted. In this function's Evaluate method, we're using the String.Format Method (String, Object) method. By using this function, you can format a static string and/or a field / calculated field value.

See also:
How to use a custom function in a query expression

Implementing Custom Functions
How to: Implement a Custom Criteria Language Operator
String.Format Method


MVC Dashboard - How to store JSON connections in a database

$
0
0

This example demonstrates how to create new JSON connections in MVC Dashboard's Data Source wizard and store them in a database.

Set the DashboardExtensionSettings.CanCreateNewJsonDataSource property to True to allow creating new JSON connections. Implement the IDataSourceWizardConnectionStringsStorage interface to create custom connection string storage, and use the DashboardConfigurator's SetConnectionStringsProvider method to assign it to the MVC Dashboard.

In this example, connections are stored in a database using Entity Framework. To run the example, modify the "ConnectionStorage" connection string in Web.config.

Files to look at:

ConnectionStringsStorage.cs (VB: ConnectionStringsStorage.vb)
MyJsonConnection.cs (VB: MyJsonConnection.vb)
Global.asax.cs (VB: Global.asax.vb)

How to implement OData v4 service with XPO

$
0
0

This example describes how to implement an OData v4 service with XPO. This example is an ASP.NET MVC 5 Web API project and provides simple REST API for data access.

Steps to implement:

1. Create a new ASP.NET Web Application project and select the Web API project template (refer to the Create the Visual Studio Project section in this example for details.

2. Install the following nuget packages:
• DevExpress.Xpo
• Microsoft.AspNet.OData

3. Define your data model - implement persistent classes and initialize the data layer. If you are new to XPO, refer to the following articles to learn how to do this: Create Persistent Class, Map to Existing Tables.

4. Add files from the CS\OdataService\Helpers folder in this example to your project (Quick Tip: Add files to Visual Studio projects the easy way).

5. Modify the Application_Start() method declared in the Global.asax file: register the model body validator class and initialize the Data Access Layer.
[C#]
protectedvoidApplication_Start(){GlobalConfiguration.Configuration.Services.Replace(typeof(IBodyModelValidator),newCustomBodyModelValidator());GlobalConfiguration.Configure(WebApiConfig.Register);XpoDefault.DataLayer=ConnectionHelper.CreateDataLayer(AutoCreateOption.SchemaAlreadyExists,true);}publicclassCustomBodyModelValidator:DefaultBodyModelValidator{readonlyConcurrentDictionary<Type,bool>persistentTypes=newConcurrentDictionary<Type,bool>();publicoverrideboolShouldValidateType(Typetype){returnpersistentTypes.GetOrAdd(type,t=>!typeof(IXPSimpleObject).IsAssignableFrom(t));}}

6. Modify the WebApiConfig.cs file: create an ODataModelBuilder instance and register an EntitySet for each persistent class:
[C#]
publicstaticvoidRegister(HttpConfigurationconfig){config.Count().Filter().OrderBy().Expand().Select().MaxTop(null);ODataModelBuildermodelBuilder=CreateODataModelBuilder();ODataBatchHandlerbatchHandler=newDefaultODataBatchHandler(GlobalConfiguration.DefaultServer);config.MapODataServiceRoute(routeName:"ODataRoute",routePrefix:null,model:modelBuilder.GetEdmModel(),batchHandler:batchHandler);}staticODataModelBuilderCreateODataModelBuilder(){// Include persistent classes to the EdmModel:ODataModelBuilderbuilder=newODataConventionModelBuilder();varcustomers=builder.EntitySet<Customer>("Customers");customers.EntityType.HasKey(t=>t.CustomerID);// ..// Include custom actions and functions into the EdmModel.builder.Function("TotalSalesByYear").Returns<decimal>().Parameter<int>("year");returnbuilder;}

7. Add OData controllers to the Controllers folder. An OData controller is a class inherited from the Microsoft.AspNet.OData.ODataController class. Each controller represents a separate data model class created on the third step.

8. Implement the required methods in controllers (e.g., Get, Post, Put, Path, Delete, etc.). For reference, use existing controllers in this example. For example: CS\ODataService\Controllers\CustomersController.cs.

How to bind Data Grid to Azure SQL data

$
0
0

This example illustrates how to fetch data from the Azure SQL data base and show it in the GridControl.

Note that in order to bind any data set to a data-aware control, this data set must implement either the IList or IListSource interface. Refer to the Data Binding help article to learn more.

This example contains sample AdventureWorksLT data. To generate a sample database identical to the one used in this example, follow the Quickstart: Create a single database in Azure SQL Database using the Azure portal, PowerShell, and Azure CLI Microsoft article.

Three Ribbon buttons allow you to bind to a sample Azure database using one of the following methods:

• direct binding to a standard DataTable object;
• binding with a DevExpress SqlDataSource component;
• binding with an Entity Framework model.

alt text

To run this example, you need to:

create a server-level firewall rule for your database;
• specify your connection settings in the Main method.

alt text

How to: Implement a Custom Model for a Pie Chart Slice

DataGrid - How to implement a context menu for editing, adding and deleting rows

$
0
0

This example demonstrates how to implement a context menu for editing, adding and deleting rows of dxDataGrid.
Use the onContextMenuPreparing event to create a custom menu. In the event handler, check if the current row is the data row. Then, add the corresponding items ("edit", "insert", "delete") to the e.items array. Handle the onItemClick event for each item. In the event handler, call the editRow, insertRow or removeRow methods to edit the current row, add a new row or remove the current row.

Files to look at: index.html

(Obsolete) How to provide the capability to bind appointment labels to a datasource

ASPxGridView - How to edit multiple selected rows in a single Edit Form


How to use Pivot Grid as a Master Filter item

$
0
0

This example demonstrates how to make the Pivot dashboard item behaves like a single-select Master Filter item. This approach uses several features: filtering by dashboard parameters, access to underlying controls, conditional formatting, and API methods to access the underlying data.

1. Create a set of dashboard parameters corresponding to dimensions in the Pivot item you want to use for filtering. This example uses four parameters: ProductParam, CategoryParam, CountryParam, and CityParam. They correspond to the Product, Category, Country, and City fields used in the rows and columns section of the Product Amount by Periods Pivot item.

2. Handle the DashboardDesigner.DashboardItemClick event to get dimensions' values from the clicked element and pass them to dashboard parameters.
[C#]
voidOnDashboardItemClick(objectsender,DashboardItemMouseActionEventArgse){if(e.DashboardItemName=="pivotDashboardItem1"&&!skipFiltering){dashboardDesigner1.BeginUpdateParameters();//clear all parametersClearPivotFilter();//set selected columns and rows to parametersSetParameterValue(e.GetAxisPoint("Column"));SetParameterValue(e.GetAxisPoint("Row"));dashboardDesigner1.EndUpdateParameters();}}
The skipFiltering variable indicates whether the Expand / Collapse button is pressed, and is used to skip setting filters in this case.

3. The code snippet above does not set or clear dimension values inaccessible for the clicked element. You need to set parameter values that correspond only to the selected intersection and clear previous values in the dashboard parameters before setting new ones.
Create the following methods used to clear parameter values:
[C#]
voidClearPivotFilter(){PivotDashboardItempivotItem=dashboardDesigner1.Dashboard.Items["pivotDashboardItem1"]asPivotDashboardItem;ClearParameters(pivotItem.Columns);ClearParameters(pivotItem.Rows);}voidClearParameters(DimensionCollectiondimensions){foreach(vardimensionindimensions)dashboardDesigner1.Parameters[GetParameterDataMember(dimension.DataMember)].SelectedValue=null;}

4. The Dashboard Designer raises the DashboardDesigner.DashboardItemClick event when an end user clicks the Expand / Collapse button in a row or column. Handle the DashboardDesigner.DashboardItemControlCreated event to skip setting filters in this case.
[C#]
boolskipFiltering=false;privatevoiddashboardDesigner1_DashboardItemControlCreated(objectsender,DevExpress.DashboardWin.DashboardItemControlEventArgse){if(e.DashboardItemName=="pivotDashboardItem1"){e.PivotGridControl.MouseDown+=PivotGridControl_MouseDown;}}privatevoidPivotGridControl_MouseDown(objectsender,MouseEventArgse){PivotGridControlpivot=senderasPivotGridControl;PivotGridHitInfohi=pivot.CalcHitInfo(e.Location);skipFiltering=(hi.ValueInfo!=null&&hi.ValueInfo.ValueHitTest==PivotGridValueHitTest.ExpandButton);}

5. To filter other dashboard items by dashboard parameters related to the Pivot Item, add all required dimensions to these items. If you do not want to display dimensions to end users, place dimensions to the "Hidden Dimensions" section.
Then add the following filter expression to the dashboard item:
([Dimension1] = ?Dimension1Param Or ?Dimension1Param Is Null) And
([Dimension2] = ?Dimension2Param Or ?Dimension2Param Is Null) And
...
([DimensionN] = ?DimensionNParam Or ?DimensionNParam Is Null)
This example uses the following expression:
([Product] = ?ProductParam Or ?ProductParam Is Null) 
And ([Category] = ?CategoryParam Or ?CategoryParam Is Null) 
And ([Country] = ?CountryParam Or ?CountryParam Is Null) 
And ([City] = ?CityParam Or ?CityParam Is Null)
The image below shows the expression for the Chart and Grid dashboard items:


The steps above are sufficient to implement the minimal filtering functionality. Further steps improve the UI behavior.

1. Optional. To highlight cells selected in the Pivot Grid, add the format rule with the following expression:
(?CityParam Is Not Null Or ?CountryParam Is Not Null Or ?ProductParam Is Not Null Or ?CategoryParam Is Not Null) And ([Product] = ?ProductParam Or ?ProductParam Is Null) And ([Category] = ?CategoryParam Or ?CategoryParam Is Null) And ([Country] = ?CountryParam Or ?CountryParam Is Null) And ([City] = ?CityParam Or ?CityParam Is Null)

2. Optional. Handle the DashboardDesigner.CustomizeDashboardItemCaption event to add the Clear Master Filter button to the item’s caption:
[C#]
voidOnCustomizeDashboardItemCaption(objectsender,CustomizeDashboardItemCaptionEventArgse){if(e.DashboardItemName=="pivotDashboardItem1"){DashboardToolbarItemshowDataItem=newDashboardToolbarItem("Clear Master Filter",newAction<DashboardToolbarItemClickEventArgs>((args)=>{dashboardDesigner1.BeginUpdateParameters();ClearPivotFilter();dashboardDesigner1.EndUpdateParameters();}));showDataItem.Enabled=IsAnyFilterSet();showDataItem.SvgImage=svgImageCollection1[0];e.Items.Insert(0,showDataItem);}}

How to display detailed data for a clicked Pivot's element

$
0
0

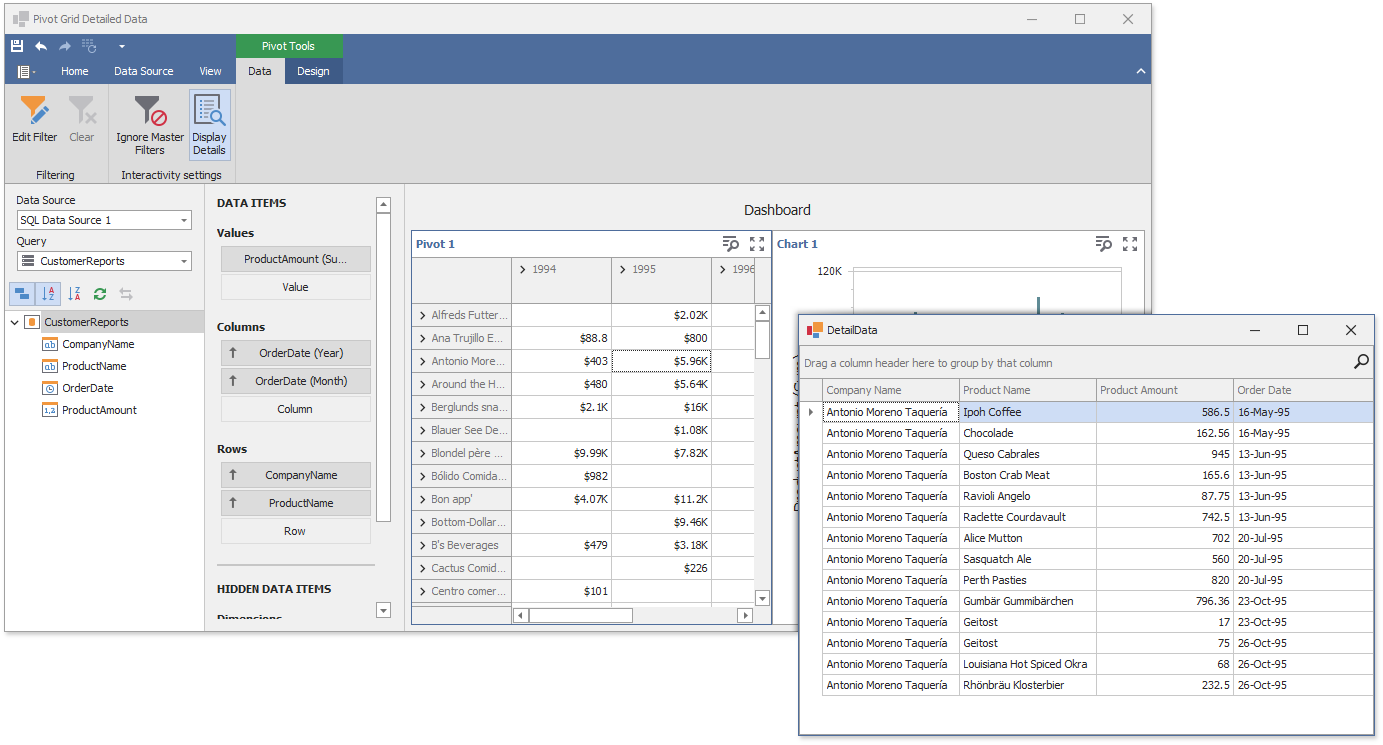
This example shows how to create an extension for the Dashboard Designer / Dashboard Viewer controls that displays detailed data for a clicked pivot element (a data cell or a field value). This extension add the Display Details button to the ribbon, that behaves like default interactivity options. So that end users who design dashboards can enable or disable this functionality in the same manner as Drill-Down, Master Filtering, or other options.

The example contains a solution with two projects:

1. PivotDetailExtension– contains the code related to the extension. This project produces a custom class library (PivotDetailExtension.dll) that can be referenced and reused in other Designer / Viewer applications.
2. DesignerSample– is a simple dashboard designer application that demonstrates how to use the extension.

This approach has the following limitations:

1. When you duplicate the Pivot item, the state of the Display Details option is ignored.
2. The Display Details option's changes cannot be reverted by the "Undo" and "Redo" Ribbon buttons.

Below you find a step-by-step instruction to create the extension from scratch. You can divide the task implementation to several parts:

Interactivity action code 1. Create a form that displays detailed data from the clicked item. This extension uses XtraForm with GridControl.

2. Handle the DashboardDesigner.DashboardItemClick event to get information about the clicked element. Call the DashboardItemMouseHitTestEventArgs.GetUnderlyingData method to obtain the element's underlying data and display them in your custom form.
[C#]
voidDashboardItemClick(objectsender,DashboardItemMouseActionEventArgse){using(DetailDatadetailForm=newDetailData(e.GetUnderlyingData())){detailForm.ShowDialog();}}

3. The Dashboard Designer raises the DashboardDesigner.DashboardItemClick event when an end user clicks the expand / collapse button in a row or column or click an empty area. To skip displaying the details dialog in these case, handle the DashboardDesigner.DashboardItemControlCreated event with the following logic:
[C#]
booldoNotShowDataForThisArea=false;voidPivotGridControl_MouseDown(objectsender,MouseEventArgse){PivotGridControlpivot=senderasPivotGridControl;PivotGridHitInfohi=pivot.CalcHitInfo(e.Location);doNotShowDataForThisArea=(hi.HitTest==PivotGridHitTest.Value&&hi.ValueInfo.ValueHitTest==PivotGridValueHitTest.ExpandButton)||(hi.HitTest==PivotGridHitTest.None);}
The doNotShowDataForThisArea variable determines whether an end user clicked the allowed area.

Integration to Dashboard Designer 4. To allow end users to enable or disable this functionality for a specific Pivot item when designing dashboard, add a custom button to the DashboardDesigner's Ribbon toolbar.
Find the Page Group to which you can add your custom option. The following code snippet finds the PivotDataInteractivity group:
[C#]
RibbonControlribbon=targetDesigner.MenuManagerasRibbonControl;PivotToolsRibbonPageCategorycategory=ribbon.PageCategories.OfType<PivotToolsRibbonPageCategory>().First();DataRibbonPagepage=category.Pages.OfType<DataRibbonPage>().First();InteractivitySettingsRibbonPageGroupInteractivityGroup=page.Groups.OfType<InteractivitySettingsRibbonPageGroup>().First();

5. Create your custom button and add it to the found group.

6. Store information about items with enabled custom functionality. This extension uses a simple list of strings to store component names of items. As a variant, you can implement your own storage.
On the custom button click, add or remove the currently selected dashboard item's name to the storage:
[C#]
List<string>pivotItemsWithEnabledDetails;privatevoidShowDetatilsItem_ItemClick(objectsender,ItemClickEventArgse){if(targetDesigner.SelectedDashboardItemisPivotDashboardItem){if(isDetailsEnabled(targetDesigner.SelectedDashboardItem.ComponentName))pivotItemsWithEnabledDetails.Remove(targetDesigner.SelectedDashboardItem.ComponentName);elsepivotItemsWithEnabledDetails.Add(targetDesigner.SelectedDashboardItem.ComponentName);}UpdateButtonState();}

7. Determine whether the custom functionality is enabled for an item by checking its name in the storage. Add this check to the DashboardItemClick event handler.
You can aldo update your custom ribbon button's checked sate dynamically depending on the currently selected item. For this, handle the DashboardDesigner.DashboardItemSelectionChanged event.
[C#]
voidDesigner_DashboardItemSelected(objectsender,DashboardItemSelectionChangedEventArgse){if(targetDesigner.Dashboard.Items[e.DashboardItemName]isPivotDashboardItem){UpdateButtonState();}}voidUpdateButtonState(){if(targetDesigner.SelectedDashboardItem==null)return;showDetatilsButton.Checked=IsDetailsEnabled(targetDesigner.SelectedDashboardItem.ComponentName);}

Save / load custom information 8. The next step is to save information about items with enabled option to a dashboard file. To add custom information to a dashboard file when saving it, handle the DashboardDesigner.DashboardSaving event. The following code snippet serializes the collection of component names to XDocument and passes it to the UserData section intended for storing custom data:
[C#]
privatevoidDesigner_DashboardSaving(objectsender,DashboardSavingEventArgse){XmlSerializerxs=newXmlSerializer(typeof(List<string>));XDocumentxElement=newXDocument();using(XmlWriterxw=xElement.CreateWriter())xs.Serialize(xw,pivotItemsWithEnabledDetails);e.Dashboard.UserData=xElement.Root;}

9. To read this data further when opening a dashboard file, handle the DashboardDesigner.DashboardLoaded event and deserialize data from UserData section in a similar manner.

Charts for Blazor - How to filter the chart based on DataGrid selection

$
0
0

This example shows how to change a Chart's data source based on a grid's selected row. For this, handle the grid's SingleSelectedDataRowChanged event and filter/update chart's data based on a selected row.

Files to look at:

Index.razor

Three discontinuous custom time scales for the Timeline view

$
0
0

This example illustrates three discontinuous custom scales for the Timeline view which are properly aligned. The first scale is a day scale which skips Saturdays and Sundays. The second scale is an hour scale which contains only working hours from 6 to 21. The third scale with increments of 30 minutes displays hours from 6 to 21, like the second scale.

How to create a label report at runtime

$
0
0

This example demonstrates how to create a label report at runtime.

To create a report formatted to fit your labels, it is necessary to adjust some specific layout settings. Users can create labels via the Label Report Wizard with just a few clicks.
However, sometimes it is necessary to create labels at runtime. This example demonstrates which particular report settings must be adjusted for a specific label type.

We created a CustomLabelReportBuilder helper class that follows the report creation algorithm used by our Label Report Wizard. A CustomLabelReportModel class provides the following label settings.

LabelWidth and LabelHeight
Specifies the width and height of XRPanel placed into the Detail report band.

HorizontalPitch
Specifies the Detail band's multi-column settings: MultiColumn.ColumnWidth and MultiColumn.ColumnSpacing.

VerticalPitch
Defines the DetailBand.Height property.

MeasurementUnit
Defines the XtraReport.ReportUnit property.

PaperKindID
Converts to a corresponding System.Drawing.Printing.PaperKind enumeration value that is further passed to the XtraReport.PaperKind property.

TopMargin and LeftMargin
Defines the top and left report margins.

BottomMargin and RightMargin
These are empty spaces that appear on the resulting report page as right and bottom spaces. These values are calculated based on other settings.

To generate a label report at runtime, call CustomLabelReportBuilder.GenerateLabelReport with a CustomLabelReportModel object or individual settings (listed above) as an argument(s).

Take note of the LabelReportValuesHelper class - it provides methods allowing you to fetch label report type settings, such as the Label Products list and Product Details.

You can provide custom XML files with available Label Product values. For this, pass a path to the a custom XML file to the LabelReportValuesHelper constructor.
To make the default Label Report Wizard use this custom XML, enable the static DevExpress.Data.XtraReports.Labels.LabelWizardCustomization.ExternalLabelProductRepository property at the application startup.

Files to look at:

Form1.cs (VB: Form1.vb)
CustomLabelReportBuilder.cs (VB: CustomLabelReportBuilder.vb)
CustomLabelReportModel.cs (VB: CustomLabelReportModel.vb)
LabelReportValuesHelper.cs (VB: LabelReportValuesHelper.vb)
Program.cs (VB: Program.vb)
Viewing all 7205 articles
Browse latest View live


<script src="https://jsc.adskeeper.com/r/s/rssing.com.1596347.js" async> </script>